4 Fun and Easy Easter Craft Ideas for Kids
Easter is the perfect time to get creative with your little ones! Whether you’re looking for bright and cheerful decorations, fun keepsakes, or simple painting ideas, there are endless ways to celebrate with crafts. In this post, we’ll share 4 delightful Easter craft ideas for kids that are easy to make and packed with festive fun.
So, grab your craft supplies, roll up your sleeves, and let’s hop into these egg-citing projects!
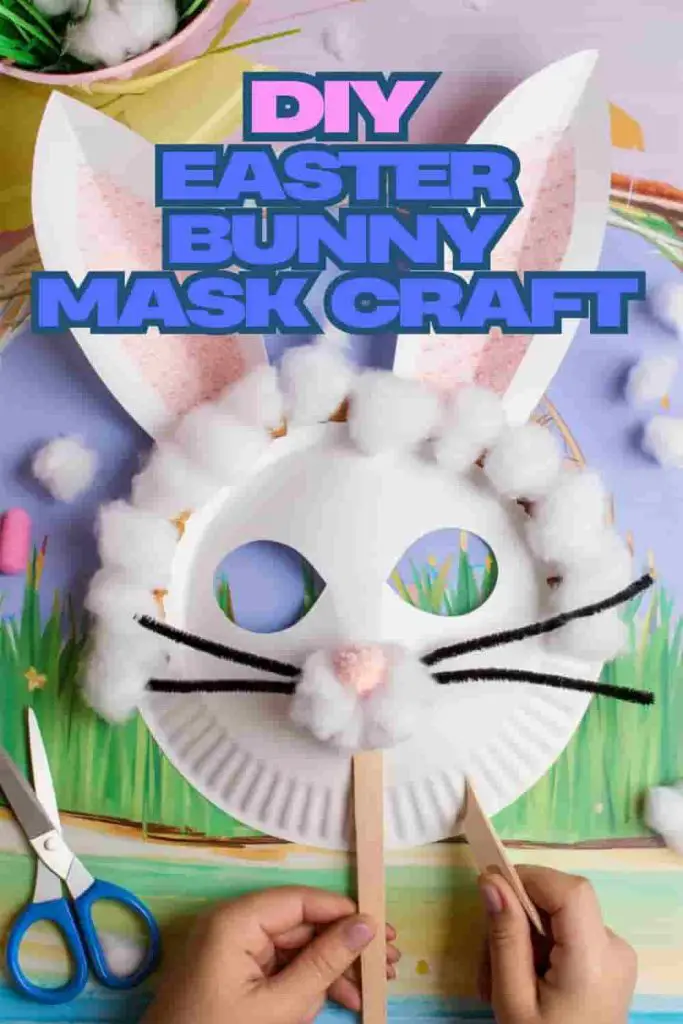
1. Paper Plate Easter Bunny Mask
Turn your little one into an Easter Bunny with this adorable DIY mask! Not only is this craft easy to make, but it also encourages imaginative play. Kids will love hopping around pretending to be a fluffy bunny once their mask is complete. Plus, it’s a great project for Easter parties or playdates!
How to Do It:
Materials Needed:
- A paper plate
- Scissors
- White and pink construction paper
- Cotton balls
- Glue
- Googly eyes
- A pink pom-pom (or a small piece of pink paper)
- Black pipe cleaners (or black paper)
- A craft stick or elastic string
- A hole punch (if using elastic)
Instructions:
- Prepare the Mask Base: Start by cutting out two eye holes from the paper plate. You can use a pencil to lightly sketch the circles before cutting to ensure they are evenly placed.
- Create the Bunny Ears: Cut two large bunny ear shapes from white construction paper. Then, cut two smaller ear shapes from pink construction paper and glue them onto the white ears to create the inner ear detail.
- Attach the Ears: Glue or tape the bunny ears to the top of the paper plate. If you want extra sturdiness, reinforce them with a strip of cardboard at the back.
- Make It Fluffy: Spread glue around the edges of the paper plate and let your child stick cotton balls all over to give the bunny a fluffy look.
- Add the Facial Features: Glue on googly eyes and attach the pink pom-pom (or a small pink paper circle) to the centre of the mask for the bunny’s nose.
- Create the Whiskers: Cut black pipe cleaners into small pieces and glue them onto either side of the nose to make whiskers. If you don’t have pipe cleaners, strips of black paper will work too.
- Attach a Handle or String:
- For a handheld mask, glue a craft stick to the bottom so kids can hold it up to their faces.
- For a wearable mask, punch holes on either side of the plate and tie a piece of elastic string to fit around your child’s head.
Now, your little one has their very own Easter Bunny mask! Encourage them to hop around, play pretend, and even put on a mini Easter performance.
2. Salt Dough Easter Decorations
Making salt dough Easter decorations is a fantastic way for kids to create long-lasting keepsakes. These ornaments can be painted in bright Easter egg colours or shaped into adorable Easter Bunny figures. Plus, they make lovely gifts for family and friends! The best part? They’re super easy to make with just three basic kitchen ingredients.
How to Do It:
Materials Needed:
- 1 cup plain flour
- ½ cup salt
- ½ cup water (adjust as needed)
- Rolling pin
- Easter-themed cookie cutters (eggs, bunnies, chicks, flowers, etc.)
- A straw or skewer (to make a hole for hanging)
- Baking tray and parchment paper
- Acrylic paints or watercolours
- Paintbrushes
- Ribbon or twine (for hanging)
- Mod Podge or clear varnish (optional, for sealing)
Instructions:
- Make the Dough:
- In a large mixing bowl, combine the flour and salt.
- Slowly add water, mixing continuously until a dough forms. You may need to adjust the water slightly to get the right consistency—it should feel like playdough and not be too sticky or too dry.
- Knead the dough for about 5 minutes until it becomes smooth and elastic.
- Roll and Cut the Shapes:
- Lightly dust a clean surface with flour and roll out the dough to about ½ cm (¼ inch) thickness.
- Use Easter-themed cookie cutters (such as Easter egg, Easter Bunny, or chick shapes) to cut out your decorations.
- If you want to hang your ornaments later, use a straw or skewer to poke a hole near the top of each shape.
- Bake the Dough Shapes:
- Preheat your oven to 100°C (200°F).
- Place the shapes onto a baking tray lined with parchment paper.
- Bake for 2 to 3 hours, or until they are completely dry and hard. If they still feel soft in the middle, return them to the oven for a little longer. Alternatively, you can air-dry them for 24-48 hours, but baking speeds up the process.
- Decorate Your Ornaments:
- Once cooled, it’s time to get creative! Let the kids paint their decorations using acrylic paints, watercolours, or markers.
- Use bright Easter colours like pastel pinks, blues, yellows, and greens.
- Add details like polka dots, stripes, or even glitter for a festive touch.
- Seal and Finish:
- To protect the paint and make the ornaments more durable, apply a coat of Mod Podge or clear varnish.
- Once dry, thread ribbon or twine through the holes and hang them up on an Easter tree, around the house, or even on gift bags!
Now, you have beautiful handmade Easter decorations that kids will be proud to display. This craft is a wonderful way to create treasured keepsakes while making fun family memories.
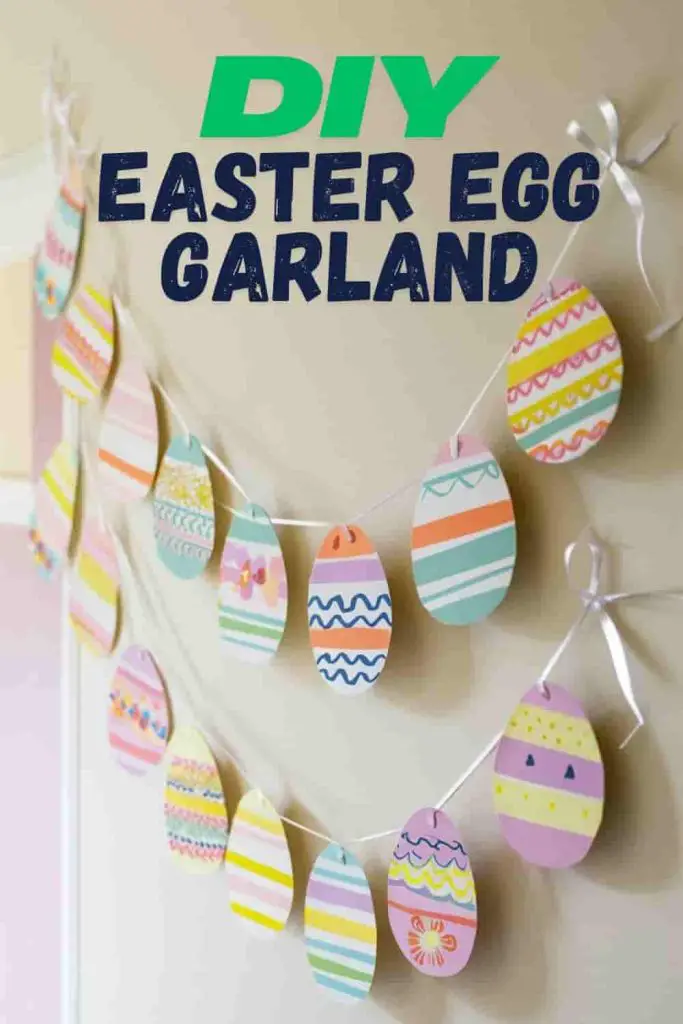
3. DIY Easter Egg Garland
A DIY Easter Egg Garland is a fun and festive way to decorate your home for Easter! This easy craft allows kids to get creative with painting ideas, patterns, and colours while making a lovely decoration to hang across mantels, doorways, or walls. The best part? It’s completely customisable—go for bright pastels, polka dots, or even add a bit of sparkle for extra flair.
How to Do It:
Materials Needed:
- Coloured cardstock or white paper (for painting)
- Scissors
- Easter egg templates (or you can draw freehand)
- Paint, markers, or crayons
- Stickers, sequins, or glitter (optional)
- Hole punch
- Ribbon, string, or twine
- Clothespins or tape (optional, for hanging)
Instructions:
- Prepare the Easter Egg Cutouts:
- Draw or print an Easter egg template onto cardstock or plain white paper. You can make them all the same size or cut out different sizes for variety.
- Carefully cut out the eggs. If younger children are involved, you may want to pre-cut the shapes for them.
- Decorate the Easter Eggs:
- Let the kids go wild with painting ideas—use watercolours, acrylics, or even sponge painting to create colourful designs.
- If using markers or crayons, add stripes, polka dots, zigzags, or swirls for a classic Easter egg look.
- Stickers, sequins, or even small craft feathers can add extra texture and fun!
- Punch Holes for Stringing:
- Once the decorated eggs are dry, use a hole punch to make two small holes at the top of each egg.
- Make sure the holes are evenly spaced so the eggs hang nicely on the garland.
- Assemble the Garland:
- Thread ribbon, string, or twine through the holes, arranging the eggs in the order you like. Leave some space between each egg so they hang freely.
- If you want a different style, use clothespins to attach the eggs to the string instead.
- Hang and Enjoy!
- Drape the Easter egg garland across a mantel, window, wall, or doorway.
- Secure the ends with tape, thumbtacks, or simply tie them around hooks or nails.
- Stand back and admire your beautiful, handmade Easter decoration!
This craft is a fantastic way to get kids involved in decorating for Easter while allowing them to express their creativity with colours and designs. Plus, it’s a decoration that can be reused every year!
4. Easter Handprint Chick
Handprint crafts are always a hit with kids, and this Easter Handprint Chick is no exception! This adorable keepsake captures little hands in a fun and creative way while celebrating the Easter season. It’s a great craft for toddlers and preschoolers, helping them develop fine motor skills while playing with colour and texture. Plus, it makes a cute Easter card or decoration to gift to family and friends!
How to Do It:
Materials Needed:
- Yellow paint (washable, child-safe)
- A paintbrush or sponge
- White or coloured cardstock/paper
- Googly eyes
- Orange construction paper (or orange marker/crayon)
- Scissors
- Glue stick or school glue
- Black marker (for details)
Instructions:
- Prepare the Painting Area:
- Lay down newspaper or a plastic tablecloth to keep surfaces clean.
- Have wipes or a damp cloth nearby for easy clean-up.
- Make the Handprint Chick Body:
- Pour yellow paint onto a paper plate or palette.
- Using a paintbrush or sponge, apply the paint evenly to your child’s hand.
- Press their hand firmly onto a sheet of cardstock or construction paper. The fingers should be spread slightly apart to resemble the chick’s fluffy feathers.
- Carefully lift the hand straight up to avoid smudging.
- Let it dry completely before decorating.
- Add the Face and Details:
- Once dry, glue on googly eyes near the thumb area, which will act as the chick’s face.
- Cut a small triangle from orange construction paper and glue it under the eyes as the chick’s beak. Alternatively, you can draw the beak with an orange marker.
- Cut out two small orange feet and glue them to the bottom of the chick.
- Use a black marker to draw tiny wings on the sides if you like.
- Finishing Touches:
- If desired, add extra decorations, such as glitter, feathers, or a small bow for a cute touch.
- You can also write a sweet Easter message like “Hoppy Easter!” or “Chirping in to wish you a Happy Easter!” if making a card.
Now, your Easter Handprint Chick is ready to brighten up the Easter festivities! This craft is not only adorable but also a wonderful keepsake to remember how tiny those little hands once were.
Crafting is a wonderful way to celebrate Easter with kids. These Easter craft Ideas are not only fun but also a fantastic way to encourage creativity, fine motor skills, and festive excitement! Whether you’re making fluffy bunnies, bright eggs, or colourful decorations, these activities will bring plenty of joy to your home.
So, which of these crafts will you try first? Gather your supplies and get ready for a hoppy Easter filled with creativity and fun!